環境
- iOS 12.1.4
実装準備
1. GoogleDeveloperアカウント関連
前提としてGoogleDeveloperアカウントが必要です。
1-1. TeamIDをメモ
下記URLでTeamIDを確認する
https://developer.apple.com/account/#/membership/
1-2. AuthKeysを取得
下記URLでAuthKeyを作成しダウンロードする(.p8ファイル)。 AuthKeyのIDをメモしておく。
https://developer.apple.com/account/resources/authkeys/list
作成の途中で「Apple Push Notifications service (APNs)」にチェックを入れることを忘れないように
1-3. Identifiersを取得
下記URLでIdentifiersを作成しダウンロード
https://developer.apple.com/account/resources/identifiers/list
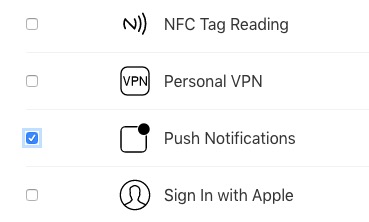
作成途中で「Capabilities > Push Notifications」にチェックを入れることを忘れないように

2. Firebase関連
Firebaseプロジェクトはあらかじめ作成しておいてください
2-1. GoogleService-info.plistを取得
- Firebase Console で iOSのアプリを追加し、GoogleService-info.plistを取得
https://console.firebase.google.com
2-2. AuthKeyのアップロード
コンソールサイドバーにある歯車からプロジェクトの設定 > Cloud MessagingでAPNs認証キーを登録します。
その際1-1, 1-2でメモした情報を入力します
3. Xamarin設定関係
3-1 GoogleService-info.plistをコピー
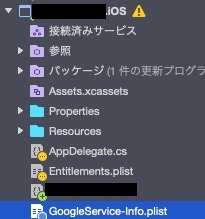
2-1で取得したGoogleService-info.plistをiOSのルートにコピーします。

GoogleService-info.plistを右クリック->「ビルドアクション」->「BundleResource」を選択
3-2 GoogleService-info.plistを編集
Xcodeで展開し、IS_GCM_ENABLEキーがtrueであることを確認。trueでない場合はtrueにする。
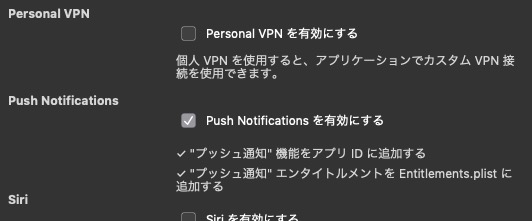
3-3 Entitlements.plistを編集
下記図のようにPush Notificationsにチェックを入れる

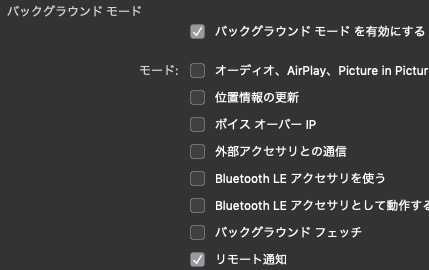
3-4 info.plistを編集
下記図のようにリモート通知を許可する

実装
Xamarin実装
AppDelegate.csにて下記の実装を行う
using System;
using System.Collections.Generic;
using System.Linq;
using Firebase.CloudMessaging;
using Foundation;
using UIKit;
using UserNotifications;

namespace App.iOS
{
    [Register("AppDelegate")]
    public partial class AppDelegate : global::Xamarin.Forms.Platform.iOS.FormsApplicationDelegate, IMessagingDelegate, IUNUserNotificationCenterDelegate
    {
        public override bool FinishedLaunching(UIApplication app, NSDictionary options)
        {
            Xamarin.Calabash.Start();
            global::Xamarin.Forms.Forms.Init();
            LoadApplication(new App());

            Firebase.Core.App.Configure();
            Messaging.SharedInstance.Delegate = this;

            if (UIDevice.CurrentDevice.CheckSystemVersion(10, 0))
            {
                // iOS10.0
                UNUserNotificationCenter.Current.Delegate = this;
                var authOptions = UNAuthorizationOptions.Alert | UNAuthorizationOptions.Badge | UNAuthorizationOptions.Sound;
                UNUserNotificationCenter.Current.RequestAuthorization(authOptions, (granted, error) =>
                {
                    Console.WriteLine(granted);
                });
                UIApplication.SharedApplication.RegisterForRemoteNotifications();
            } else
            {
                //iOS9以前 今回の記事ではカバーしない
                //参考:https://github.com/xamarin/GoogleApisForiOSComponents/blob/master/docs/Firebase/CloudMessaging/GettingStarted.md
            }
            return base.FinishedLaunching(app, options);
        }

        [Export ("messaging:didReceiveRegistrationToken:")]
        public void DidReceiveRegistrationToken(Messaging messaging, string fcmToken)
        {
            //FCMトークンを取得
            Console.WriteLine($"Firebase registration token: {fcmToken}");
        }
    }
}
実機で実行し、通知を許可すると、FCMトークンが取得できることを確認する。
FCMトークン値はメモしておく
FCM送信テスト
Firebaseコンソール -> Cloud Messaging -> Send your first messageでテストを行う。
タイトルとテキストを入力し、「テキストメッセージを送信」をクリック。
先ほど確認したFCMトークンを設定し、テストを行う。
以上